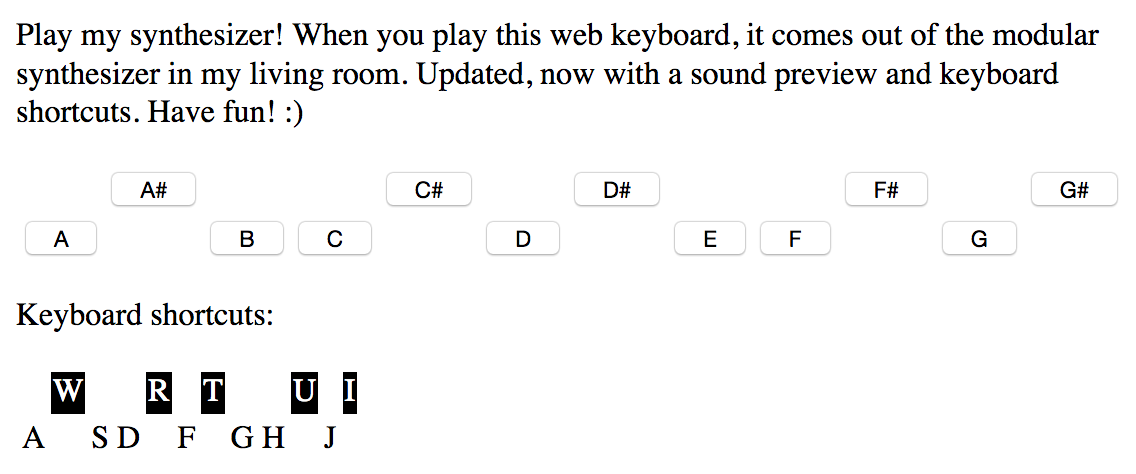
The final component of Web Synth is the actual website interface. It provides an ultra-basic user interface to play a one-octave span. I made some improvements a day or two into the experiment, adding the ability to use keyboard keys and playing a recorded sample of the audio over the web browser. Even so, it’s just a fun toy — nothing slick going on here!
The HTML
<?xml version="1.0" encoding="UTF-8" ?>
<!DOCTYPE html>
<html xmlns="http://www.w3.org/1999/xhtml">
<head>
<meta http-equiv="Content-Type" content="text/html; charset=UTF-8" />

<title>Play My Home Synthesizer!</title>

<!-- https://jquery.com
You may prefer to load this from the CDN instead of directly from the server as done here -->
<script type="text/javascript" src="jquery.js"></script>


<!-- You may prefer to load this from the CDN instead of directly:
<script type="text/javascript" src="//cdn.jsdelivr.net/particle-api-js/5/particle.min.js"></script>-->


<!-- Our Javascript code for this page -->
<script type="text/javascript" src="testapi.js"></script>

<!-- css -->

</head>
<body>

<audio id='Asound'><source src="sounds/A.mp3" type="audio/mpeg"></audio>
<audio id='Assound'><source src="sounds/As.mp3" type="audio/mpeg"></audio>
<audio id='Bsound'><source src="sounds/B.mp3" type="audio/mpeg"></audio>
<audio id='Csound'><source src="sounds/C.mp3" type="audio/mpeg"></audio>
<audio id='Cssound'><source src="sounds/Cs.mp3" type="audio/mpeg"></audio>
<audio id='Dsound'><source src="sounds/D.mp3" type="audio/mpeg"></audio>
<audio id='Dssound'><source src="sounds/Ds.mp3" type="audio/mpeg"></audio>
<audio id='Esound'><source src="sounds/E.mp3" type="audio/mpeg"></audio>
<audio id='Fsound'><source src="sounds/F.mp3" type="audio/mpeg"></audio>
<audio id='Fssound'><source src="sounds/Fs.mp3" type="audio/mpeg"></audio>
<audio id='Gsound'><source src="sounds/G.mp3" type="audio/mpeg"></audio>
<audio id='Gssound'><source src="sounds/Gs.mp3" type="audio/mpeg"></audio>

<p>Play my synthesizer! When you play this web keyboard, it comes out of the modular
	synthesizer in my living room. Updated, now with a sound preview and keyboard shortcuts.
	Have fun! :)</p>

<table>
	<tr>
		<td>
		<td><button onClick="playNote('A#3', 'Assound')">A#</button>
		<td>
		<td>
		<td><button onClick="playNote('C#4', 'Cssound')">C#</button>
		<td>
		<td><button onClick="playNote('D#4', 'Dssound')">D#</button>
		<td>
		<td>
		<td><button onClick="playNote('F#4', 'Fssound')">F#</button>
		<td>
		<td><button onClick="playNote('G#4', 'Gssound')">G#</button>
	</tr>
	<tr>
		<td><button onClick="playNote('A3', 'Asound')">A</button>
		<td>
		<td><button onClick="playNote('B3', 'Bsound')">B</button>
		<td><button onClick="playNote('C4', 'Csound')">C</button>
		<td>
		<td><button onClick="playNote('D4', 'Dsound')">D</button>
		<td>
		<td><button onClick="playNote('E4', 'Esound')">E</button>
		<td><button onClick="playNote('F4', 'Fsound')">F</button>
		<td>
		<td><button onClick="playNote('G4', 'Gsound')">G</button>
		<td>
	</tr>
</table>

<p>Keyboard shortcuts:</p>
<table>
	<tr>
		<td>
		<td bgcolor=black><font color=white>W</font>
		<td>
		<td>
		<td bgcolor=black><font color=white>R</font>
		<td>
		<td bgcolor=black><font color=white>T</font>
		<td>
		<td>
		<td bgcolor=black><font color=white>U</font>
		<td>
		<td bgcolor=black><font color=white>I</font>
	</tr>
	<tr>
		<td>A
		<td>
		<td>S
		<td>D
		<td>
		<td>F
		<td>
		<td>G
		<td>H
		<td>
		<td>J
		<td>
	</tr>
</table>
</body>
</html>
There are three important parts to take note of in this listing:
- Loading JavaScript, jQuery and testapi.js
- Audio tags, which create an addressable element to play sound samples
- The piano button table
Notice that each button’s onClick sends both the note value to play and the name of the sample that corresponds to it. This makes things easy to prototype, so that adding more samples is a trivial change to the HTML document.
The JavaScript
$(document).ready(function() {
	initPage();
});


function initPage() {
	// Hook up handlers using jquery

  $(document).keypress(function(e){keyhandler(e);})


}

function keyhandler(e) {

  switch (e.charCode) {

    case 97:
      playNote('A3', 'Asound');
      break;
    case 115:
      playNote('B3', 'Bsound');
      break;
    case 100:
      playNote('C4', 'Csound');
      break;
    case 102:
      playNote('D4', 'Dsound');
      break;
    case 103:
      playNote('E4', 'Esound');
      break;
    case 104:
      playNote('F4', 'Fsound');
      break;
    case 106:
      playNote('G4', 'Gsound');
      break;


    case 119:  //A#
      playNote('A#3', 'Assound');
      break;

    case 114:  //C#
      playNote('C#4', 'Cssound');
      break;

    case 116:  //D#
      playNote('D#4', 'Dssound');
      break;

    case 117:  //F#
          playNote('F#4', 'Fssound');
      break;

    case 105:  //G#
          playNote('G#4', 'Gssound');

    break;
    default:
    //alert("other pressed");

  }

}

function playNote(note, sound) {

        document.getElementById(sound).play();

        $.post("https://api.particle.io/v1/devices/5c25aa86665e7ea48ea64ab4/playnote",
        {
          note: note,
          access_token: "fda4fe5c0b3a34cfc4807c22004ef0429da015c4"
        },
        function(data,status){
            ; //alert("Data: " + data + "\nStatus: " + status);
        });

}
About two-thirds of this listing is the key-mapping to let you play notes directly from the
computer keyboard. It is a copy-paste of standard jQuery code, so we’ll skip it here.
The big, bad piece of code that commands the Particle API is actually very tiny using jQuery, and it’s completely contained in the playNote() function.
The first line, document.getElementById(sound).play(); searches the HTML DOM for the provided <audio> tag id and plays the sound.
The rest executes a jQuery POST to the proper URL with the necessary parameters. The URL contains the device UID that is used to uniquely address your Photon module, and ends with the method name of the function we are calling. (This was set up previously in the firmware’s call to Particle.function("playnote", funcPlayNote).)
The parameters are “note”, which is the note name in a text format (i.e. “D#4”) and your access token which is necessary to control your device. You can find this number in your developer console and reset it at will. Note that changing this number should revoke any hard-coded interfaces (like this synth toy) from your devices.
There is also a commented-out alert box call that optionally shows the function return status. From the firmware listing in the previous article, Data of -1 corresponds to an error and 0 means success. The Status shows the result of the HTTP call to the Particle API.
Security?
If you know something about the Particle system, you might have noticed that I’ve severely abused it to make this demo. One thing that is a definite no-no is giving out your developer access token. This number, with a minor amount of effort, allows an attacker to download code to all of your development devices. There is a really nice system for pushing access down to individual users through the Particle API, however for this quick demo, there doesn’t seem to be a simple way to limit access for a single device while also making access to it public.
For that reason, I just put the demo out there and trusted that there was enough of a disjoint set between friends who are 1337 enough, mean enough, and have time enough to do that to me 🙂
Summary
Overall, I’m really impressed with how fast this demo came together. I figured it was going to take a good chunk of the week before it was either finished or I lost interest, but it really only took about a day to get a working prototype online. That’s a testament to the ease of use of the Particle system, and the simplicity that they’ve brought to a nearly incomprehensible stack of interwoven technologies required to make this work. Even though I shoehorned it into this toy, it’s definitely an easy choice for a certain kind of IoT project.